Metal Roofing Screws: A Homeowner's Guide for Oregon
If you've seen a brown stain on the attic side of a ceiling after a hard Oregon rain, the leak often didn't start at the shingle edge or the ridge. It started at a fastener. In our climate, with long wet seasons, Coast Range wind storms, moss buildup, and salty air reaching inland from the central coast, metal roofing screws get worked harder than most homeowners realize.
A screw on a metal roof isn't just a little piece of hardware. It holds the panel down, seals the hole, and helps the roof stay quiet when wind starts pressing on the edge of the house. That's why a good metal roof conversation includes the screws, the washer, the coating, the substrate, and the fastening pattern, not just the panel color.
Table of Contents
- Why Screws Matter More Than Homeowners Realize
- Anatomy of a Metal Roofing Screw
- Screw Types You Are Likely to Be Offered
- Coatings and Corrosion Resistance in Wet and Coastal Air
- Fastener Patterns, Spacing, and Oregon Code Basics
- Installation Details That Decide Whether the Roof Leaks
- Common Misconceptions and Coastal Warning Signs
Why Screws Matter More Than Homeowners Realize
A neighbor in the mid-Willamette Valley usually spots the problem after the leak has already shown itself. The ceiling stain appears during a wet spell, and the first guess is flashing, underlayment, or a failed panel seam. In a lot of cases, the trouble started at a screw that looked fine from the ground, but never sealed cleanly, never bit into sound material, or started corroding under the washer before any water reached the interior.
The fastener does three jobs at once
A metal roof screw has to clamp the panels, resist uplift, and keep water out of the hole it made. A 1998 study in the Journal of Structural Engineering found that screwed steel cladding connections can fail by local pull-through or dimpling of the sheet, or by pull-out from the supporting members, and the researchers concluded the older design formula could be unsafe unless a reduced capacity factor of 0.4 was used in that context (ASCE study0733-9445(1998)124:10(1192))).
That matters in Salem, Keizer, and along the coast because a bright screw head can still be a weak fastener if the wood below is thin, the hole is off, or the threads never got enough purchase. On a wet roof, the screw is part of the weather barrier and the structural system at the same time. A good-looking head does not tell you whether the washer is compressed evenly or whether the shank is beginning to rust where you cannot see it.
Practical rule: If the screw can't be trusted to hold and seal, the panel above it can't be trusted either.
Why Pacific Northwest weather exposes weak fasteners fast
A marginal screw may survive for a while on a dry roof in a mild climate. Western Oregon is harder on fasteners. Repeated wetting and drying, moss growth, and wind-driven rain all work on the washer and the coating. Near Lincoln City and Newport, salt air adds another layer of stress, so hidden shank corrosion becomes a real concern, not a theory. The failure often starts small, then shows up later as staining, loose panels, or rust streaks that were easy to miss during the first walkaround.
That is why I treat screws the same way I treat flashing and underlayment. They are not an accessory. An Oregon CCB-licensed roofer should document the fastener type, the coating, the substrate condition, the spacing, and the washer compression before any screw goes in. If that record is vague, the roof work is already on shaky ground.
Anatomy of a Metal Roofing Screw
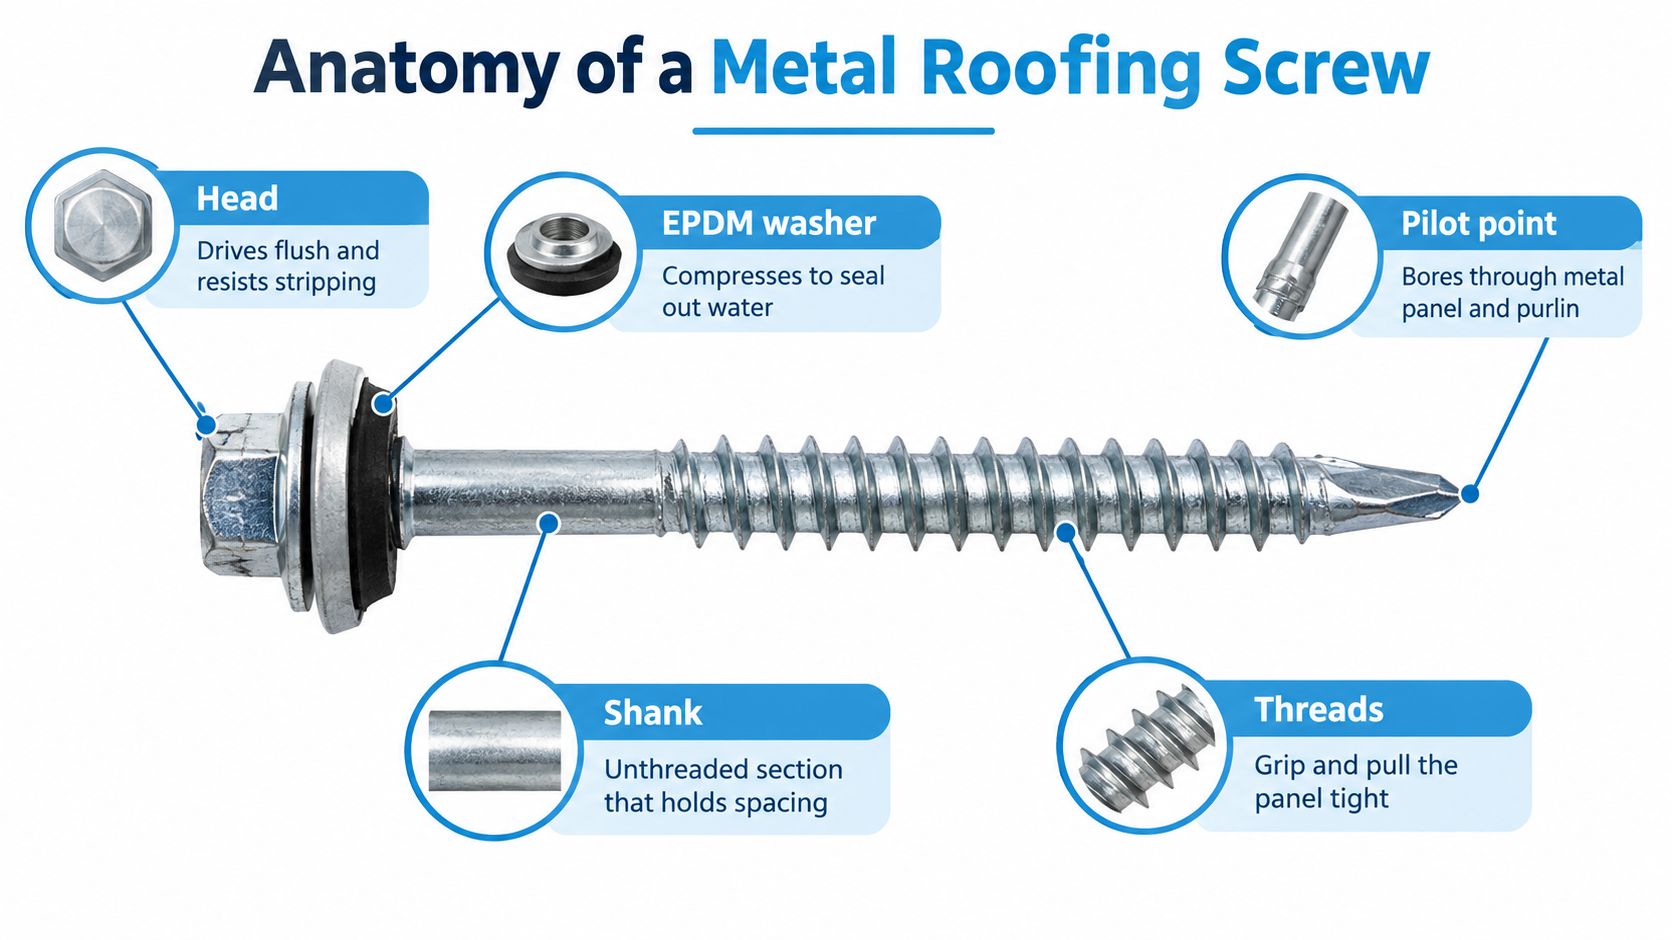
A metal roofing screw looks ordinary until you have to replace a row of failed fasteners on a damp Salem roof. Every part does a different job, and one weak piece can let the whole assembly leak, loosen, or rust out early. Homeowners do not need to know every brand, but they should know what each part is doing.
Tip, threads, shank, head, washer
The point or drill tip starts the hole. On self-drilling fasteners, it cuts through the metal before the threads grab, which changed installation practice in the early 1960s when hardened-steel self-drilling screws became a practical alternative to older self-tapping methods (Rollforming Magazine's metal roofing hall of fame).
The threads are the grip. They bite into the substrate and resist pull-out. The shank is the body between the head and the threaded section, and it helps clamp the layers together. The head has to take the driver cleanly and survive proper torque. The washer, usually EPDM, compresses to seal the penetration and keep Oregon rain out.
A roofing screw is not a plain wood screw or a nail. A nail depends mostly on friction. A metal roofing screw depends on drive depth, thread engagement, and washer compression. On a wet roof, the installer's hand matters as much as the fastener itself.
What the washer really does
The washer is the gasket. If it is too loose, water can work under it. If it is crushed flat, split, or distorted, it can leave a leak path even when the head still looks fine from the ground. Installation guidance calls for UV-stable EPDM bonded washers because the washer is part of the weather seal, not a throwaway piece.
A screw that looks tight can still be wrong if the washer is not seated correctly.
For homeowners, the practical point is simple. An exposed-fastener metal roof is a small mechanical assembly, not a single screw. Tip, threads, shank, head, and washer all have to work together.
Screw Types You Are Likely to Be Offered
A roofing estimate in Oregon usually narrows the choice to a few screw types, and they do different jobs. The right one depends on the panel profile, what sits under it, and how close the roof is to steady moisture or salt air.
Exposed fastener or concealed clip fastener
Exposed-fastener screws are common on corrugated and many R-panel systems. The head stays visible, and each screw depends on a washer to seal the penetration. Concealed clip-fastener systems work differently. The screws fasten the clips, while the panel face stays cleaner because the fasteners are not exposed in the same way.
That difference matters in western Oregon. Exposed-fastener systems are common and can perform well, but they put more of the fastening system out in the weather. Concealed systems reduce visible fastener exposure, yet they still depend on correct clip fastening and compatible materials under the panel.
Self-drilling or self-tapping
A self-drilling screw is used when the fastener must cut through metal as it goes in. A self-tapping screw generally needs a preformed hole or a different substrate condition. As covered in the anatomy section, self-drilling screws consolidated hole-making and fastening into one step.
For homeowners, the key question is fit, not the label on the box. Wood framing, plywood, steel purlins, and mixed assemblies all change what makes sense under the panel.
Carbon steel or stainless
Coated carbon steel is common. Stainless is often the better choice in salt air or heavy exposure. A Florida Building Commission report recommends stainless steel, copper, or silicon-bronze fasteners for higher-exposure roofing conditions, with type 316 stainless steel specifically recommended where chloride exposure is significant (Florida Building Commission report).
Hidden corrosion is the part that catches people off guard on the central coast. A screw can look fine at the head while the shank under the washer is starting to lose strength. That is why washer compression, coating quality, and material choice need to be checked together, not one at a time.
| Screw Category | Typical Panel | Fastener Material | Washer Type | Best Fit in Oregon |
|---|---|---|---|---|
| Exposed fastener | Corrugated, R-panel | Coated carbon steel or stainless | EPDM bonded washer | Inland roofs, dry sheltered sites |
| Concealed clip fastener | Standing seam | Compatible stainless or coated fasteners | System-specific components | Higher-end systems, cleaner appearance |
| Self-drilling | Metal to metal, some mixed assemblies | Coated carbon steel or stainless | EPDM bonded washer | Steel substrates, purlin systems |
| Self-tapping | Metal to wood in some assemblies | Coated carbon steel or stainless | EPDM bonded washer | Wood framing when approved by the panel maker |
A Salem-area roofer should also put the fastener choice in writing before any screws go in. That means the screw type, coating, washer style, substrate, and approved panel system should all be clear in the job notes. If you want a deeper look at panel systems and fastener selection, this metal roofing service page is a useful place to start.
Coatings and Corrosion Resistance in Wet and Coastal Air
In western Oregon, corrosion is a service-life problem, not a cosmetic one. A screw can look fine from the street and still be weakening where the shank sits under the washer, especially in damp shade, around cut edges, or near salt air.
Why “galvanized” is too broad to be useful
People say “galvanized” as if it means one thing. It does not. A Florida Building Commission investigation found that C-3 mechanically galvanized fasteners showed less than 0.1% surface rust after 1,000 hours in ASTM B117 salt-fog exposure, while an N200 mechanically galvanized fastener showed approximately 10% surface rust after 950 hours (Florida Building Commission report). That test compares products under lab conditions, so it is not a field-life promise, but it shows why coating choice matters.
For homes in Salem or Keizer, steady damp air is usually the issue. On the coast, in places like Lincoln City and Newport, salt-influenced air and wind-driven moisture add another layer of stress. A fastener that holds up inland can age much faster near the ocean.
Salt air reaches farther than the beach
The FEMA corrosion bulletin notes that salt spray from breaking waves and onshore winds accelerates corrosion, and that corrosion can substantially weaken nominally galvanized light-gauge connectors in partially sheltered coastal exposures within 5 to 10 years or sooner (FEMA technical bulletin). Coastal exposure is not limited to houses on the bluff or right on the sand.
Homes farther inland can still get hit by salty wind. The practical move is to treat the screw as part of a system, not a single part number. Screw, washer, coating, panel metal, and any treated lumber all need to work together.
Watch for this: rust staining around screw rows often starts before the screw head looks obviously failed.
Hidden shank corrosion is the part homeowners miss
The Florida research also found corrosion concentrated in moisture-exposed conditions and mostly in zinc-coated carbon-steel fasteners, with electrogalvanized fasteners more likely to corrode than other commonly used corrosion-resistant options (Florida Building Commission draft report). That matches what shows up in the field. The head may still look decent while the buried shank is already thinning, which cuts holding power and can reduce uplift resistance.
Washer compression matters too. If the washer is overcrushed, the seal gets stressed; if it is too loose, water can work under it. In coastal air, that small detail can decide whether a screw stays dry at the shank or starts corroding where nobody sees it.
A Salem-area roofer should put the fastener choice in writing before any screws go in. The note should spell out the screw type, coating, washer style, substrate, and approved panel system. That gives the owner a clear record if a problem shows up later, and it keeps everyone honest about what was installed.
Fastener Patterns, Spacing, and Oregon Code Basics
A roof doesn't get stronger just because somebody added more screws in a hurry. It gets stronger when the fastening pattern matches the panel design, the support spacing, and the wind loads the roof will face.
What the spacing depends on
Oregon code points installers back to the applicable code and the panel manufacturer's instructions. It doesn't give one universal screw pattern for every metal roof. For steel roofs, it calls for galvanized fasteners if manufacturer instructions aren't available, and it allows stainless-steel fasteners for metal roofs generally; for copper roofs, it names copper, brass, bronze, copper-alloy, or 300-series stainless fasteners (Oregon residential code).
That's the right approach. The screw diameter, length, washer type, and spacing all shift with roof slope, panel width, support type, and exposure. A roof in the Coast Range wind corridor is not the same as a sheltered garage in town.
What a homeowner should see in writing
A good estimate should spell out the panel type, substrate, fastener material, washer type, and fastening pattern. If the installer is vague about that, ask for the written schedule before work starts. Oregon code expects fastening to follow the panel manufacturer's instructions, not someone's memory from a different job.
A manufacturer guide can show how density changes with support spacing, and another technical guide notes common spacing along purlins or sheathing around 12 to 24 inches, with tighter patterns at edges and in windy locations (manufacturer guide). Those are examples, not a universal rule for every home, but they show how much the support layout matters.
What to ask before the first screw goes in
- Fastener schedule: Ask which rows get tighter spacing at eaves, rakes, ridges, and laps.
- Substrate check: Ask how the crew will confirm the screws are biting into sound wood or the right steel support.
- Panel match: Ask whether the screw, washer, and coating are approved for the exact panel system.
- Permit and code: Ask who is handling local permit requirements and whether the fastener plan matches Oregon code.
The fastening pattern should be documented before installation, not figured out on the roof.
Installation Details That Decide Whether the Roof Leaks
A screw can look clean and still be wrong. Around Salem, I see that problem show up after repeated rain, moss growth, and thermal movement have had time to work on the fasteners.
What to check from the ground
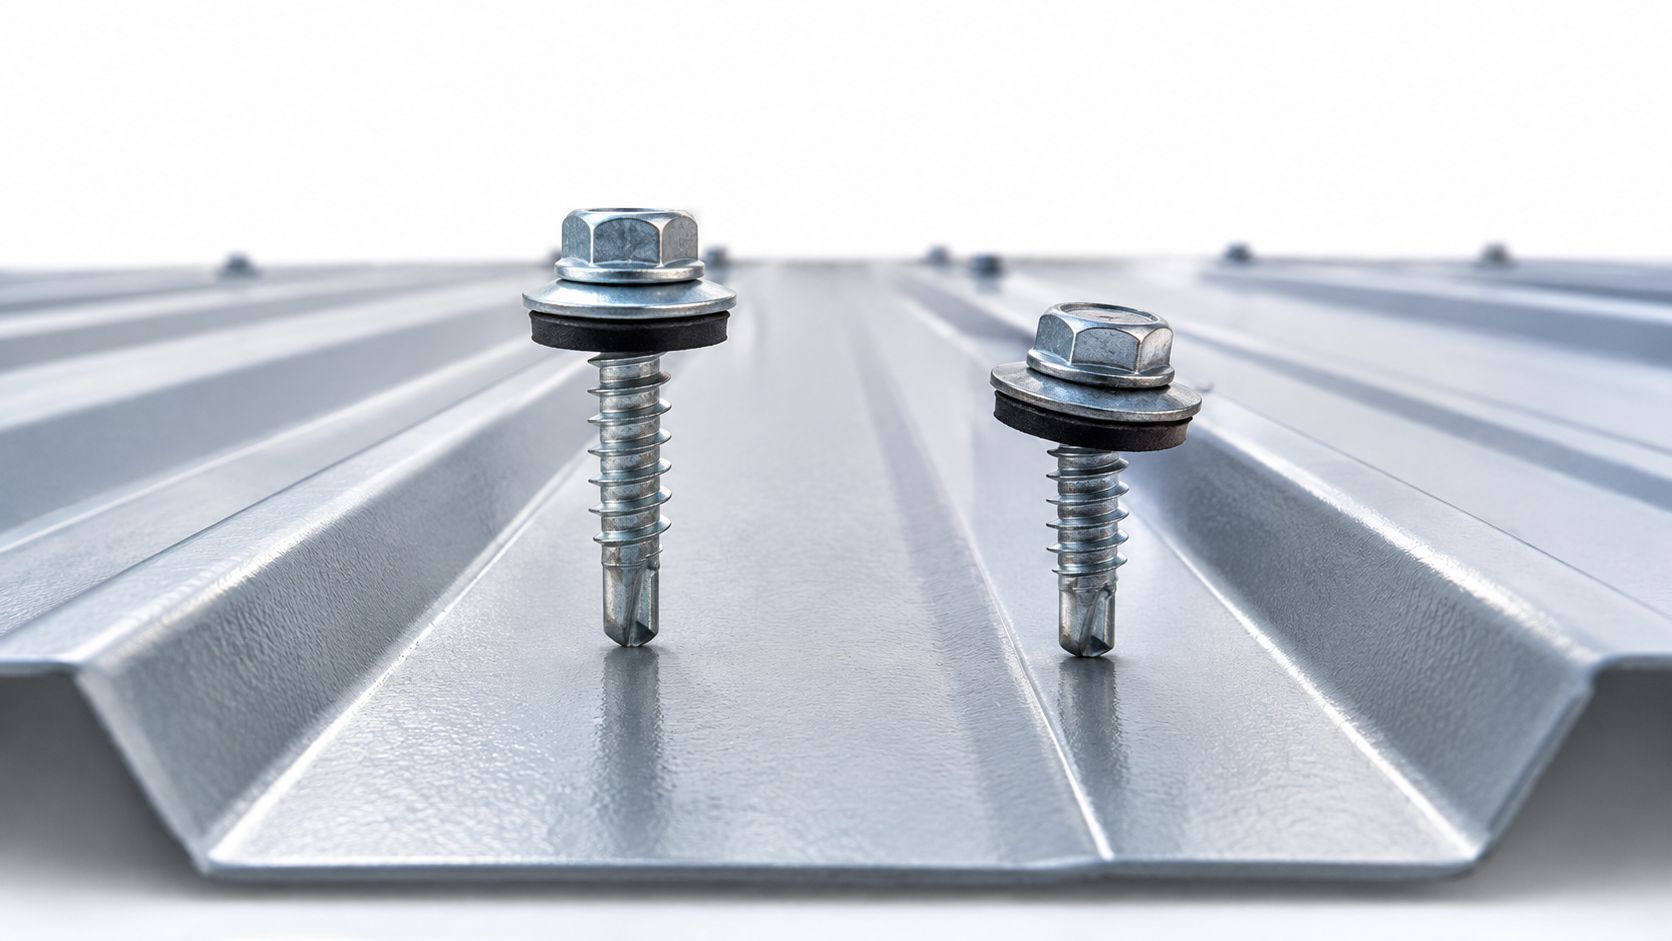
On exposed-fastener roofing, I want the screws to sit straight, not cocked. I want the washer compressed enough to seal, but not flattened or squeezed loose from under the head. The installation guidance says the screw should be driven perpendicular to the panel, with the washer showing slight, uniform edge bulging instead of being crushed flat.
A visual walk-around catches a lot. Look for dimpling around the fastener row, shiny missing washers, staining below screw lines, or screws that sit at odd angles. Those are signs the fastener may have been overdriven, underdriven, or set into weak material.
Why torque isn't one-size-fits-all
There isn't a single torque setting that works for every roof. Substrate thickness, screw geometry, panel stack-up, driver type, and screw speed all change the setting needed to seat the washer correctly. That is why a test installation matters more than guesswork.
The same installation guidance also notes that installers should verify perpendicular alignment, consistent washer seating, no panel dimpling, and secure engagement in the framing. It also says a representative screw should be removed during mock-up inspection to confirm the threads are biting into the substrate.
What the old engineering warning still means today
The 1998 connection study cited earlier showed that a visually tight screw can still have poor withdrawal resistance if the material underneath is weak or the connection is mis-specified. That is the trap homeowners run into when they assume a neat-looking fastener means a sound one.
For valley and transition areas, the metal roofing valley guide is useful because those spots need careful fastener layout and cleaner water shedding.
Common Misconceptions and Coastal Warning Signs
A fastener can look fine from the ladder and still be failing under the washer or halfway down the shank. That is the part homeowners miss, especially in western Oregon where damp air, wind-driven rain, and long wet seasons keep metal working harder than it does in a dry inland climate.
Four assumptions that cause trouble
First, coastal exposure does not stop at the shoreline. FEMA's corrosion guidance, cited earlier, shows that sheltered inland exposures can still see meaningful corrosion over time.
Second, the visible head is only part of the story. Corrosion can start on the shank or under the washer where you cannot see it from the ground. The Florida survey covered earlier, which inspected 1,300 roofs, found corrosion on 15% of them, concentrated in moisture-exposed conditions and zinc-coated carbon-steel fasteners.
Third, more screws can create new problems if they are added without a fastening plan. Extra penetrations do not help when spacing, substrate, or alignment is off.
Fourth, a better coating slows corrosion, it does not stop maintenance. It buys time, not immunity.
What a responsible inspection should include
- Fastener photos: Take close-up pictures of screw rows, especially where staining or rust shows up.
- Washer condition: Check for flattening, cracking, or washers that have slipped out of place.
- Substrate clues: Watch for loose screws, backed-out heads, or recurring leaks near the same line.
- Dissimilar metals: Ask whether the screw, panel, and any flashing materials are compatible.
A roofer who knows the local climate should be willing to document the fastener material, coating, washer type, and any visible corrosion before recommending a repair. That written record helps landlords, sellers, and homeowners compare bids in the Portland metro and along the coast. If you are already chasing a leak, this roof leak repair guide can help you sort out what is urgent and what can wait.
The practical takeaway
Use manufacturer-approved screws, document the fastening plan, and inspect before the first rusty streak becomes an interior stain. In western Oregon, that is basic roof care.